Hi all! I hope everyone is enjoying the holidays! This year I was so fortunate enough to be invited to a few holiday parties/dinners. At first I planned on wearing a different holiday themed manicure to each event. But that idea pretty much went out the window when I was up til midnight wrapping last minute presents and writing out cards a couple nights.
I'm not very good at nail art so water decals are the perfect cop out for me. The patterns are so pretty and once you get the hang of it they're fool proof to use! I wore this red and green tartan pattern for about 2-3 days, the pictures were taken on day 2 so you can see some tip wear. Considering I washed a ton of dishes, wrapped presents and washed my hair the wear of the water decal was pretty great. I used a base coat, a topcoat and I wrapped the tips. I purchased my decals from eBay through this
seller. There were no instructions included with the decals but there a ton of tutorials on YouTube...or if any of you guys would like I could also do a tutorial post in the future.
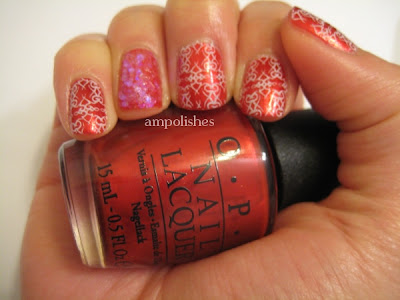
My second manicure I used OPI Die Another Day as a base, stamped a white pattern from BM - 222 and added a loose glitter accent nail. I must say that my pictures do not do the Die Another Day justice. The polish is super duper gorgeous in person. The application was a dream and it dried so glossy and shiny. Originally I just wore the base coat and could not stop starring at my nails because they looked like little glossy pieces of candy. But the downfall was that it looked so bad against with my skin tone I had to add on to it to offset the colour a little.


This manicure was my absolute favourite. I used China Glaze Winter Holly from their Holiday 2012 collection and a star glitter I fished out from NYX Girls Dreamy Glitter. This polish caught my eye just as I was about to cash out at the supply store and had to go back and grab it. I'm such a sucker for dark emerald greens. The accurate colour was so difficult to capture. In the bottle there are tonsss of green yellow and red micro-glitters shimmering all over the place in a greenish jelly base. It reminded me so much of a decorated Christmas tree that's why I had to include a star at the base of my nails! The depth and beauty of this polish really makes up for the amount of work I had to put into applying it. A top coat is absolutely necessary with this polish because the glitters dry so gritty. I did 3 thick coats to achieve opacity and 3 topcoat layers but even then I couldn't get a smooth glossy finish. These glitters were thirsty!


All polishes, water decals used in these manicures were purchased by me. In all manicures I used nail envy as a base and NYC Grand Central Station as a top coat. Stay tuned for my next couple posts about Urban Outfitters - Pink Holo, OPI Skyfall collection swatches and my favourite fall/winter items! Thanks for reading!
Annie


