

By now, I am pretty sure everyone knows how much I like this 'sugar coat' texture type polish. Whatever the name - liquid sands, sugar coat, gumdrops, pixie dust, it's going into my basket!!!
 |
| This is me when I see polish!!! (& if I was a cat teheehee..) make your own: here |
Today I have the collection of Sally Hansen Sugar Coat textured nail colour to show you! As a bonus, I've attempted nail art again! :)
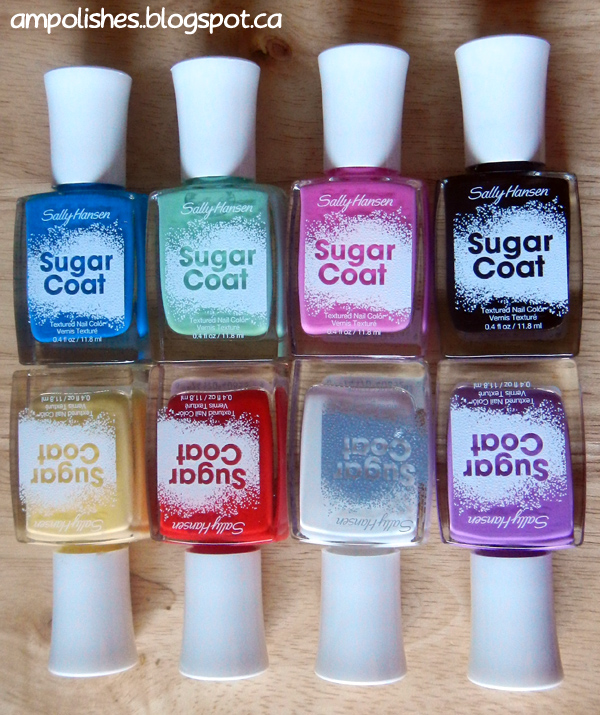
I really like the selection of colour in this collection, almost a rainbow!


From left to right: Bubble Plum, Sugar Fix, Cherry Drop, Sweetie, Razzle-Berry, Sour Apple, Cotton Candies & Lick-O-Rich
This is the first time trying this type without any glitters. I was thinking I might not like this as much but sugar coats never disappoint! They have a good grit and due to the lack of glitter - the grit seems to show more! Although plain cremes, the colours chosen are a good pick! There's pastels and vibrants + your standard black and white. If other textured polishes need an undie (although they usually don't) a nice creme colour could be the answer!
They were opaque in 1-2 coats - personally I prefer 2. They last about the same amount of time as the others (aka forever) - I wore Sugar Fix for 4 whole days without any chipping!
Swatches: 2 coats each. Very pigmented and bright - and the grit just pops!

Close ups of the colours swatched :)
 |
| L-R: Cherry Drop, Sugar Fix and Bubble Plum |
 |
| L-R: Razzle-Berry, Sweetie and Cherry Drop |
 |
| L-R: Cotton Candies, Sour Apple and Razzle-Berry |
 |
| Lick-O-Rich and Cotton Candies |

So my little set up included:
- Cardboard - in case of spills
- Cosmetic wedge - for sponging
- Thin paint brush - for fine lines and such
- Broken hair pin (because I lost my dotting tool hehe)
- Striping tape - used the tape dispenser trick :)
- Sparkley nail polish (Disco Ball - Sally Hansen)
- Orly Nail tip guides - I bought them and NEVER used it so I thought today would be a good day
Not shown: cotton pad for mistakes, scrap paper for polish drops and polish remover
whew, does that seem like alot?
Oh and before we go on, my striping tape and tip guides wasn't quite sticky on the bumpy sugar coat so my lines aren't perfect. Also the tape dispenser trick is eh - if you leave it out dust gets stuck and the 'teeth' of the dispenser is too big to rip the tape and just kind tugs at it..so I just used scissors.Just some looks I tried: (if anyone is confused with my explanations - I may put up tutorials later if interested :) just ask below!)
Left - Right: I just used the same swatch wheel - so all bases are 2 coats of the colour.
 |
| w/ flash |
1. On Razzle-Berry, I did some sort of brush-stroke gradient-thingy with Sugar Fix and Lick-O-Rich.
(From top tip to bottom) I put 2 drops of Sugar Fix, 2 drop of Razzle-Berry and 1 drop of Lick-O-Rich onto the nail. Then I took the paint brush and diagonally from light to dark colours kept stroking back and forth until I get a bit of a gradient going. I stop when I get the 'desired' effect - think stormy weather. If there was excess while stroking, I just wipe it on a cotton pad and continue.
2. On Sour Apple, I did colour-blocking with Cotton Candies.
I took a piece of striping tape to make a straight diagonal line and used Cotton Candies and messily painted a layer. After waiting about 20 seconds, I removed the tape and ta-da...crisp lines! =)
3. On Cotton Candy, I did a sponging 'gradient' with Bubble Plum.
I am still not really good at this so bear with me hahah.. On a piece of paper I put 2 drops of Bubble Plum to 1 drop of Cotton Candies. (repeat if you need more)
At first, I just try sponging Bubble Plum but noticed it didn't blend well (duh, Mir). Adding more Cotton Candies allowed it to blend a bit more. I kept patting it until
4. On Lick-O-Rich, I made it sparkly.
I added a layer of Disco Ball by Sally Hansen to see if it would be nice glittery. It was not bad but of course - it dulled the grit a bit but did not totally smooth it out.
 |
| w/ natural lighting |
 |
| w/ flash |
1. On Bubble Plum, I did leopard spots.
On a piece of paper I put drops of Sugar Fix and Lick-O-Rich. I took the paint brush and did oblong dots of Sugar Fix. After a rinse in nail polish remover, I dipped the brush in Lick-O-Rich and did C and U shapes around the dots of Sugar Fix. In the empty spaces inbetween I added more strokes of Lick-O-Rich.
2. On Sugar Fix I did a dotticure.
On a piece of paper I put drops of Sour Apple, Razzle-Berry and Lick-O-Rich. I started with the lightest colour - Sour Apple. I took my hair pin (or use a dotting tool) and random put some spaced out dots. Then I used Razzle-Berry and also did it randomly spaced making sure some touched Sour Apple. Then on top, I used Lick-O-Rich making sure most touched Sour Apple and Razzle-Berry.
3. On Cherry Drop - I did a minnie mouse-esque design.
I thought the red was just perfect :). I took my nail tip guide and used Lick-O-Rich for the tip. Then on a piece of paper I put drops of Sugar Fix. I used my hair pin to dot Sugar Fix on the rest of the nail. I thought it wasn't opaque enough and so I tried to put a second layer..which pretty much ruined the nail hahaha..... oh well :(
 |
| w/ natural lighting |
Soooo.. those were my attempts, despite the results it was pretty fun. I hope you try out some styles as well :) The variety of colour makes most combinations probable!!
Have fun!!
Mir
Extra Shots:
Close up bottle shots:
 |
| L-R: Bubble Plum (a tad pinker in real life), Sugar Fix and Cherry Drop |
 |
| L-R: Sweetie, Razzle-Berry and Sour Apple |
 |
| L-R: Sour Apple, Cotton Candies and Lick-O-Rich |

 |
| whee! I love this shot :) |

 |
| a VERY close up |
Additonal Info:
Size: 0.4 fl oz / 11.8 ml
Price: MSRP $7.49
Available: Shoppers Drug Mart, Wal-Mart and other retailers
For more information, visit Sally Hansen here
Check out their Facebook here
The colors are just WOW! I think I might need one or two in my collection! Thank you for sharing!
ReplyDeletetell me which ones you get Ashley :) - Mir
DeleteI have all of these, plus the 8 new ones...I love these textures too! I really like what you did on Razzleberry - very cool.
ReplyDelete8 new ones? please do tell ;) I can't wait to get my hands on more!
Deleteand thank you =))) it was on a whim but I am glad you like the design!
- Mir
OUUU I really love the look of the non-glitters. Sure it's not as glamorous as the ones that are glittery, but these look awesome!
ReplyDeleteagreed,, i lovee glitter.. but this is a nice change :) - Mir
DeleteI ended up buying Sour Apple and Cotton Candy. I attempted to put on Cotton Candy but made a big mess you really need to take your time and not rush this. I did like it though and after reading your post and seeing your swatches I want to get the blue one
ReplyDeleteRazzle-berry is definitely one of my favourites. I thought it was okay in application but since they are textured I did give them a bit more time inbetween coats.
Delete:)
very neat and unusual to see nail art with textured polishes. I'm not a huge fan of textured without sparkle but I'm lusting badly over zoya's fall pixie dust collection!
ReplyDeleteI thought I'd try something different and they turned out okay (well I think they did). I thought I was the same but then when I tried these I don't mind that they didn't have glitter at all!
DeleteI am also wanting the Zoyas badly!!!!
- Mir
Thank you! ^_^!
ReplyDelete